> ## Documentation Index
> Fetch the complete documentation index at: https://docs.bitscale.ai/llms.txt
> Use this file to discover all available pages before exploring further.
# Navigate the Bitscale Platform
Try Bitscale Now!
When you log into Bitscale, you land on the homepage.
### Quick ways to get started
On the homepage, you will also see:
* latest documentation links
* a product demo to help you set up your first grid quickly
## My Grids
This is where all your **grids** and **workbooks** are listed.
* A **grid** is a single workflow where each row is an entity and each column is a step.
* A **workbook** is a multi-step workflow made up of connected grids.
### Favorite a grid
1. For quick access to a grid click on the **star** icon on a grid
2. It moves into the **Starred grids** tab
### Search grids and workbooks
Use the search bar on the homepage to find any grid or workbook by name.
## Get help and support
From the bottom-left section of the app, you can:
* get support
* book a call with the team
* open the product walkthrough
* join the Slack community
You can also open the full documentation anytime from the left sidebar.
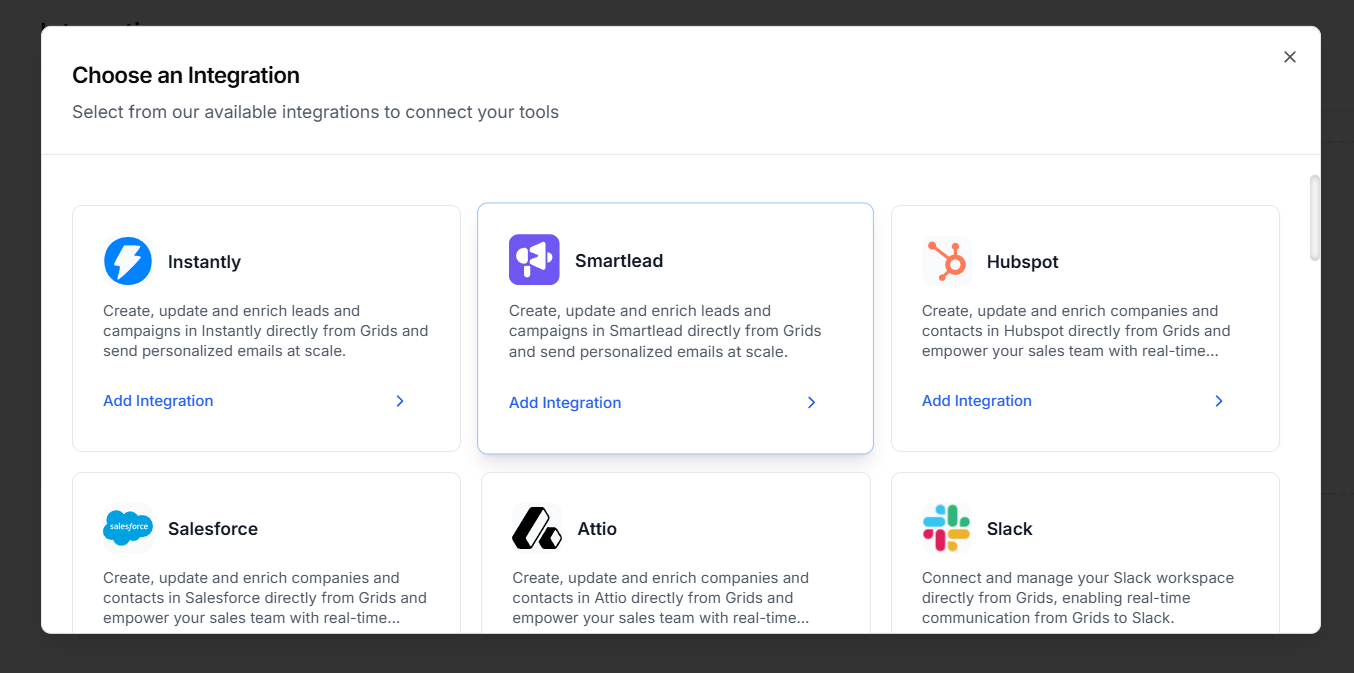
## Integrations
You can manage integrations from the **Integrations** tab in left sidebar.
Use this when you want to:
* connect a new tool
* set up a new integration
* use your own API key (BYOK)
If a tool is not listed, you can:
* request it in the community
* set up a custom API call
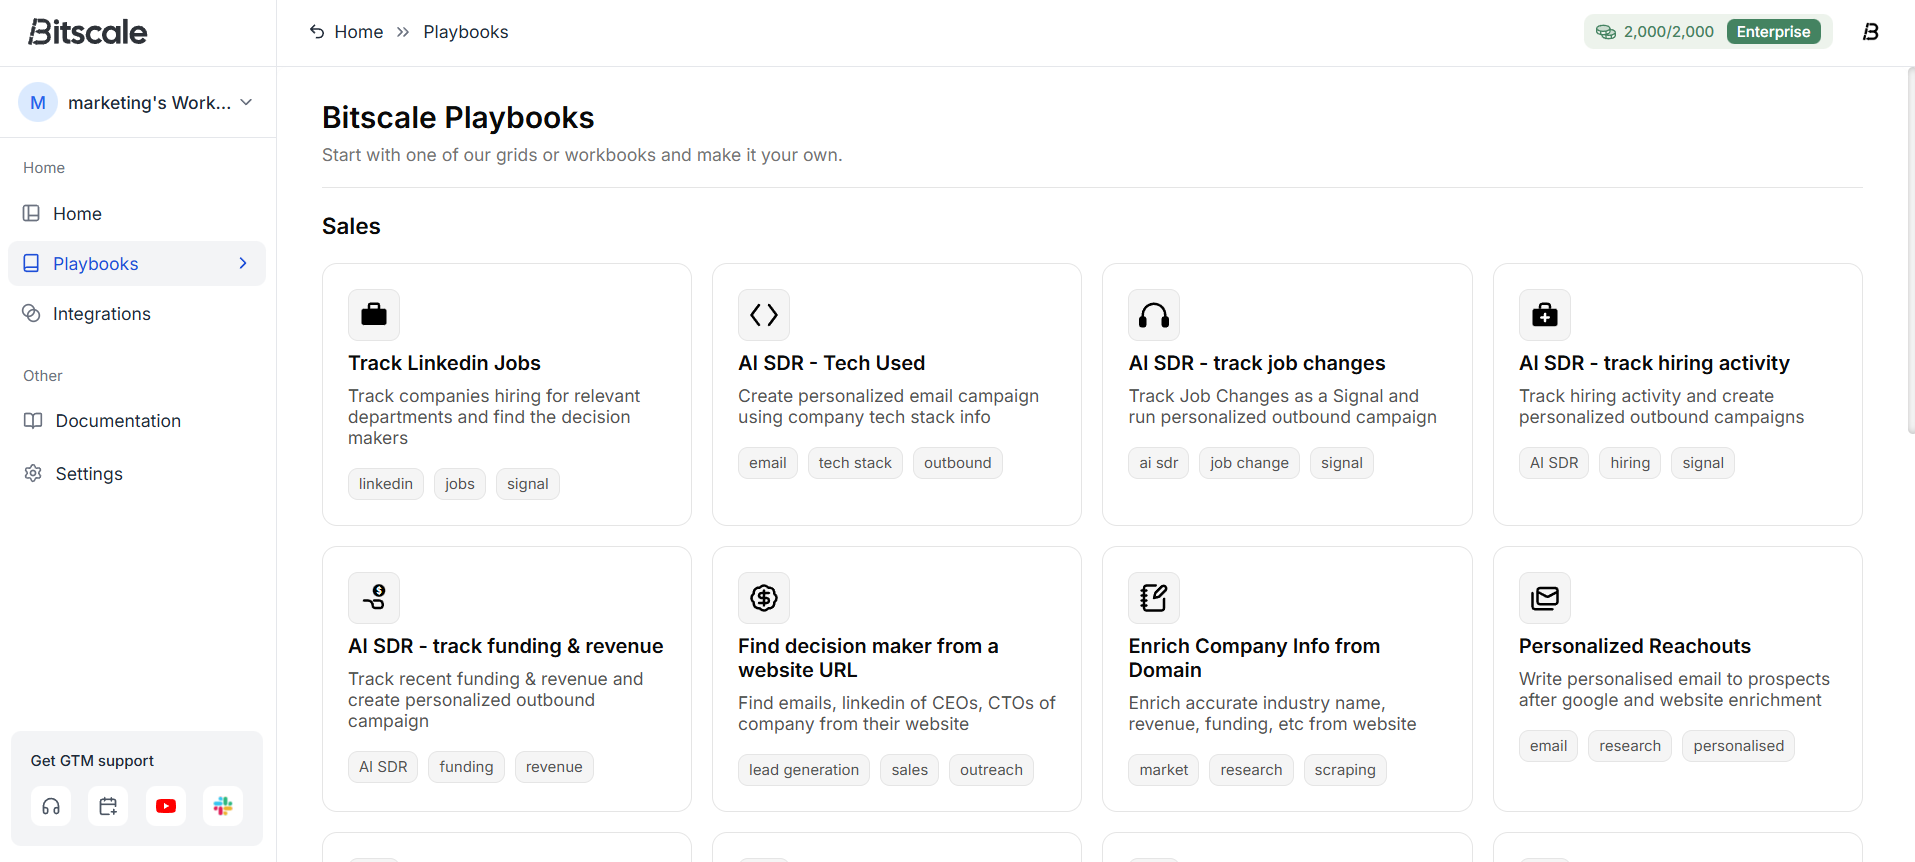
## Playbooks
Bitscale also has **Playbooks**, which are ready-to-go workflows you can directly use.
## Workspaces and team access
### Join a workspace
If your team uses the org/workspace setup:
1. Open the workspace menu
2. Click **Join workspace**
3. Search and request access (or join directly, if available)
### Invite teammates
To invite others into your workspace:
1. Go to **Settings**
2. Open **Team settings**
3. Invite members
## Create a new grid
Most work in Bitscale starts with creating a grid.
1. Click **New grid**
2. Choose a data source
Common options include:
* import your own CSV or Excel
* create a blank grid
* import company-level data, people-level data
* LinkedIn intent-based sources
* other sources like HubSpot lists, Salesforce reports, tables, and more
## Inside a grid
When you open a grid, you will see two main control areas:
* a **top panel** for building and controlling workflows
* the **main grid**
* a **bottom panel** for automation, workflow extension, and support
## Top panel (build and control workflows)
### 1. Load data
The **Load data** button (top-left) is where you manage your data sources.
You can:
* attach multiple data sources to the same grid
* schedule or automate those data sources
### Columns are workflow steps
Grids look like spreadsheets on purpose.
* each column is a step in your workflow
* you build workflows by adding steps as columns
### 2. Grid Controls
### Sort
Use **Sort by** to reorder your grid based on any column.
### Filter
Use filters when you only want to work with specific rows.
Example: export or reach out only to people from a certain geography.
### Hide or show columns
As workflows get more complex, you might create intermediate columns that exist only to power later steps.
You can hide those columns to keep your grid clean and focused.
### 3. Exporting and pushing data
If you set up integrations in your workflow, you can push enriched data to:
* CRMs
* outbound tools
* other connected destinations
If you just want a file export:
1. Go to **Actions**
2. Export as **CSV** or **Excel**
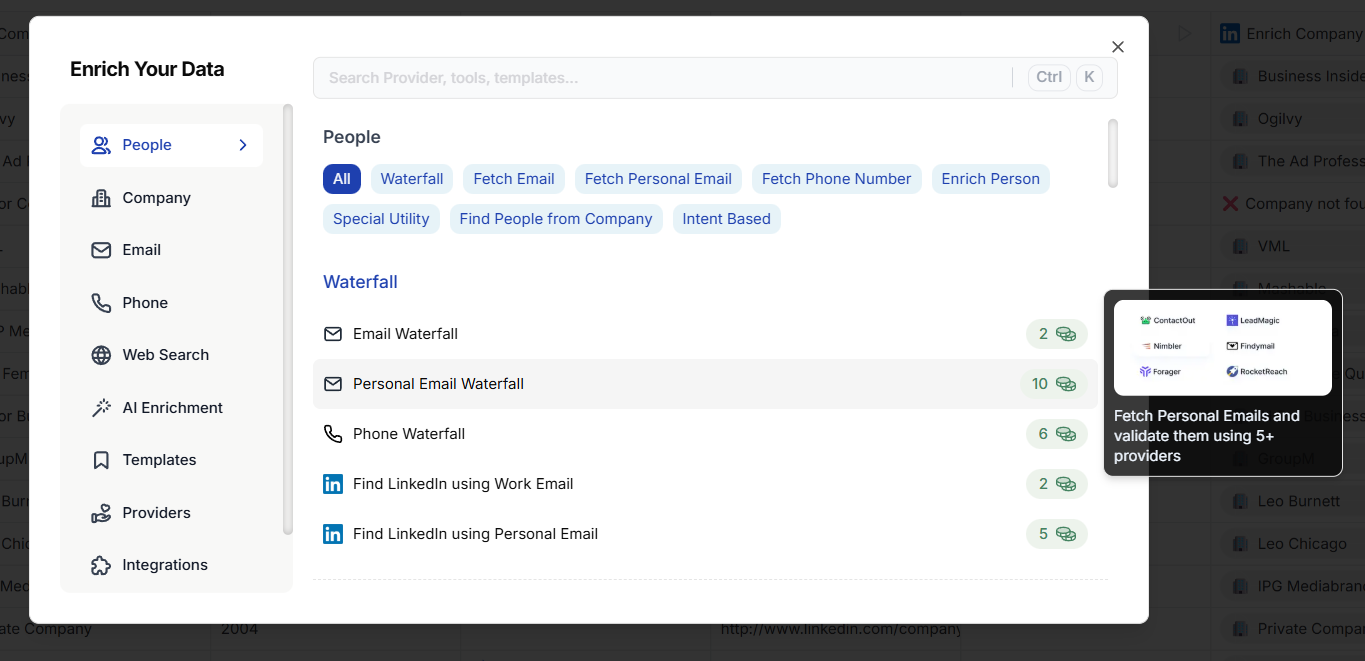
### 4. Enrichments
Any step that pulls data, researches, scrapes, or generates output is called an **enrichment**.
You can find all enrichments under the **Enrichments** tab.
They are grouped into categories like:
* people enrichments
* company enrichments
* email enrichments
* phone enrichments
* research and web research
* AI enrichments (custom or template-based)
* integration and data movement steps (push/pull between tools)
## Bottom panel (automation and workflow actions)
### 1. Convert a grid into a workbook
If you want to extend a grid into a multi-grid workflow:
1. Click the **plus** button
2. Pick the data source for the next grid
3. Bitscale creates the next grid in the workbook
## 2. Auto run and auto dedup
* **Auto run** to automate workflow runs
* **Auto dedup** to reduce duplicate entries
## 3. Bitscale Support
Access support and documentation from this tab
Explore the platform now!
This covers the basic navigation of Bitscale Platform.
For deeper guides on individual enrichments and features, use the documentation section, or reach out on the community channel.
 ### Quick ways to get started
On the homepage, you will also see:
* latest documentation links
* a product demo to help you set up your first grid quickly
## My Grids
This is where all your **grids** and **workbooks** are listed.
* A **grid** is a single workflow where each row is an entity and each column is a step.
* A **workbook** is a multi-step workflow made up of connected grids.
### Favorite a grid
1. For quick access to a grid click on the **star** icon on a grid
2. It moves into the **Starred grids** tab
### Search grids and workbooks
Use the search bar on the homepage to find any grid or workbook by name.
## Get help and support
From the bottom-left section of the app, you can:
* get support
* book a call with the team
* open the product walkthrough
* join the Slack community
You can also open the full documentation anytime from the left sidebar.
## Integrations
You can manage integrations from the **Integrations** tab in left sidebar.
### Quick ways to get started
On the homepage, you will also see:
* latest documentation links
* a product demo to help you set up your first grid quickly
## My Grids
This is where all your **grids** and **workbooks** are listed.
* A **grid** is a single workflow where each row is an entity and each column is a step.
* A **workbook** is a multi-step workflow made up of connected grids.
### Favorite a grid
1. For quick access to a grid click on the **star** icon on a grid
2. It moves into the **Starred grids** tab
### Search grids and workbooks
Use the search bar on the homepage to find any grid or workbook by name.
## Get help and support
From the bottom-left section of the app, you can:
* get support
* book a call with the team
* open the product walkthrough
* join the Slack community
You can also open the full documentation anytime from the left sidebar.
## Integrations
You can manage integrations from the **Integrations** tab in left sidebar.
 Use this when you want to:
* connect a new tool
* set up a new integration
* use your own API key (BYOK)
If a tool is not listed, you can:
* request it in the community
* set up a custom API call
## Playbooks
Bitscale also has **Playbooks**, which are ready-to-go workflows you can directly use.
Use this when you want to:
* connect a new tool
* set up a new integration
* use your own API key (BYOK)
If a tool is not listed, you can:
* request it in the community
* set up a custom API call
## Playbooks
Bitscale also has **Playbooks**, which are ready-to-go workflows you can directly use.
 ## Workspaces and team access
### Join a workspace
If your team uses the org/workspace setup:
1. Open the workspace menu
2. Click **Join workspace**
3. Search and request access (or join directly, if available)
### Invite teammates
To invite others into your workspace:
1. Go to **Settings**
2. Open **Team settings**
3. Invite members
## Create a new grid
Most work in Bitscale starts with creating a grid.
1. Click **New grid**
2. Choose a data source
## Workspaces and team access
### Join a workspace
If your team uses the org/workspace setup:
1. Open the workspace menu
2. Click **Join workspace**
3. Search and request access (or join directly, if available)
### Invite teammates
To invite others into your workspace:
1. Go to **Settings**
2. Open **Team settings**
3. Invite members
## Create a new grid
Most work in Bitscale starts with creating a grid.
1. Click **New grid**
2. Choose a data source
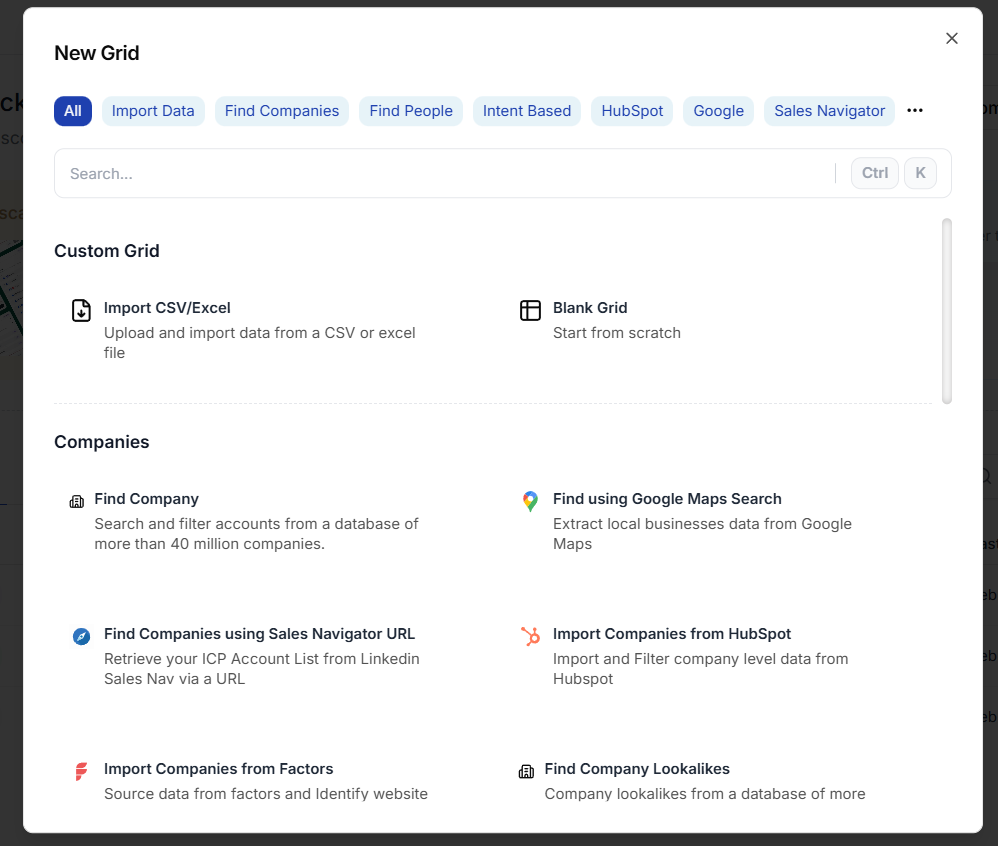 Common options include:
* import your own CSV or Excel
* create a blank grid
* import company-level data, people-level data
* LinkedIn intent-based sources
* other sources like HubSpot lists, Salesforce reports, tables, and more
## Inside a grid
When you open a grid, you will see two main control areas:
* a **top panel** for building and controlling workflows
* the **main grid**
* a **bottom panel** for automation, workflow extension, and support
Common options include:
* import your own CSV or Excel
* create a blank grid
* import company-level data, people-level data
* LinkedIn intent-based sources
* other sources like HubSpot lists, Salesforce reports, tables, and more
## Inside a grid
When you open a grid, you will see two main control areas:
* a **top panel** for building and controlling workflows
* the **main grid**
* a **bottom panel** for automation, workflow extension, and support
 ## Top panel (build and control workflows)
### 1. Load data
The **Load data** button (top-left) is where you manage your data sources.
You can:
* attach multiple data sources to the same grid
* schedule or automate those data sources
### Columns are workflow steps
Grids look like spreadsheets on purpose.
* each column is a step in your workflow
* you build workflows by adding steps as columns
### 2. Grid Controls
### Sort
Use **Sort by** to reorder your grid based on any column.
### Filter
Use filters when you only want to work with specific rows.
Example: export or reach out only to people from a certain geography.
### Hide or show columns
As workflows get more complex, you might create intermediate columns that exist only to power later steps.
You can hide those columns to keep your grid clean and focused.
### 3. Exporting and pushing data
If you set up integrations in your workflow, you can push enriched data to:
* CRMs
* outbound tools
* other connected destinations
If you just want a file export:
1. Go to **Actions**
2. Export as **CSV** or **Excel**
### 4. Enrichments
Any step that pulls data, researches, scrapes, or generates output is called an **enrichment**.
You can find all enrichments under the **Enrichments** tab.
## Top panel (build and control workflows)
### 1. Load data
The **Load data** button (top-left) is where you manage your data sources.
You can:
* attach multiple data sources to the same grid
* schedule or automate those data sources
### Columns are workflow steps
Grids look like spreadsheets on purpose.
* each column is a step in your workflow
* you build workflows by adding steps as columns
### 2. Grid Controls
### Sort
Use **Sort by** to reorder your grid based on any column.
### Filter
Use filters when you only want to work with specific rows.
Example: export or reach out only to people from a certain geography.
### Hide or show columns
As workflows get more complex, you might create intermediate columns that exist only to power later steps.
You can hide those columns to keep your grid clean and focused.
### 3. Exporting and pushing data
If you set up integrations in your workflow, you can push enriched data to:
* CRMs
* outbound tools
* other connected destinations
If you just want a file export:
1. Go to **Actions**
2. Export as **CSV** or **Excel**
### 4. Enrichments
Any step that pulls data, researches, scrapes, or generates output is called an **enrichment**.
You can find all enrichments under the **Enrichments** tab.
 They are grouped into categories like:
* people enrichments
* company enrichments
* email enrichments
* phone enrichments
* research and web research
* AI enrichments (custom or template-based)
* integration and data movement steps (push/pull between tools)
## Bottom panel (automation and workflow actions)
### 1. Convert a grid into a workbook
If you want to extend a grid into a multi-grid workflow:
1. Click the **plus** button
2. Pick the data source for the next grid
3. Bitscale creates the next grid in the workbook
## 2. Auto run and auto dedup
* **Auto run** to automate workflow runs
* **Auto dedup** to reduce duplicate entries
## 3. Bitscale Support
Access support and documentation from this tab
They are grouped into categories like:
* people enrichments
* company enrichments
* email enrichments
* phone enrichments
* research and web research
* AI enrichments (custom or template-based)
* integration and data movement steps (push/pull between tools)
## Bottom panel (automation and workflow actions)
### 1. Convert a grid into a workbook
If you want to extend a grid into a multi-grid workflow:
1. Click the **plus** button
2. Pick the data source for the next grid
3. Bitscale creates the next grid in the workbook
## 2. Auto run and auto dedup
* **Auto run** to automate workflow runs
* **Auto dedup** to reduce duplicate entries
## 3. Bitscale Support
Access support and documentation from this tab